- Messages
- 17,489
Dreambox Image Install With FlashWizard Pro
1. Extract Flashwizard Pro to a folder of your Choice.
2. Start Flashwizard with the FlashwizardPro.exe.
3. Click the configuration tab and select you language.

4. On the same page you'll need to fill in the Connection Parameters at the top of the page.
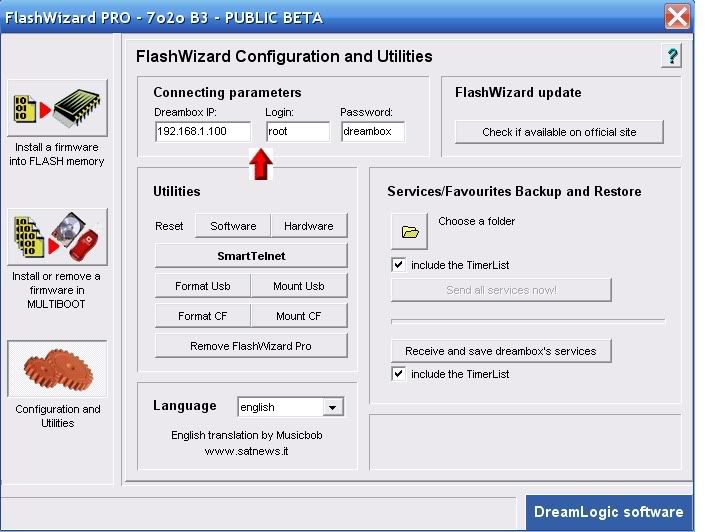
5. If you have not changed you password Login= root password = dreambox.
6. To obtain your dreambox IP do the following on your dreambox remote.
Menu-Setup-Expert Setup-Communication Setup.
You'll see your IP at the top of the page make a note of this and enter this IP into Flashwizard.
Also untick the DHCP box so your Dreambox IP will never change and remain static.
7. Now click the install a firmware tab top left.
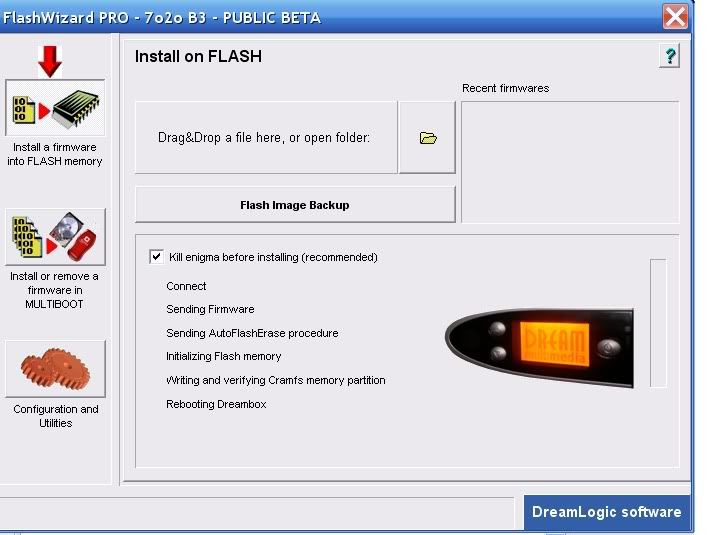
8. Now click on the yellow folder, this will open a browser window.
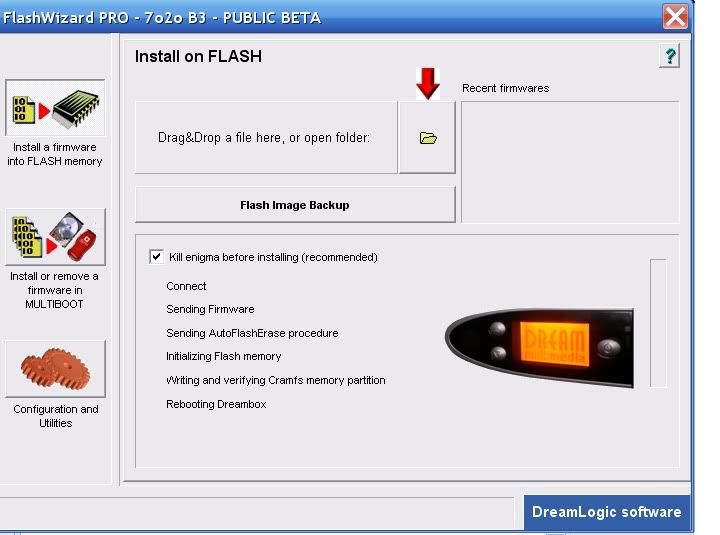
9. Now navigate to the Dreambox image you would like to install.

10. At the prompt select YES.
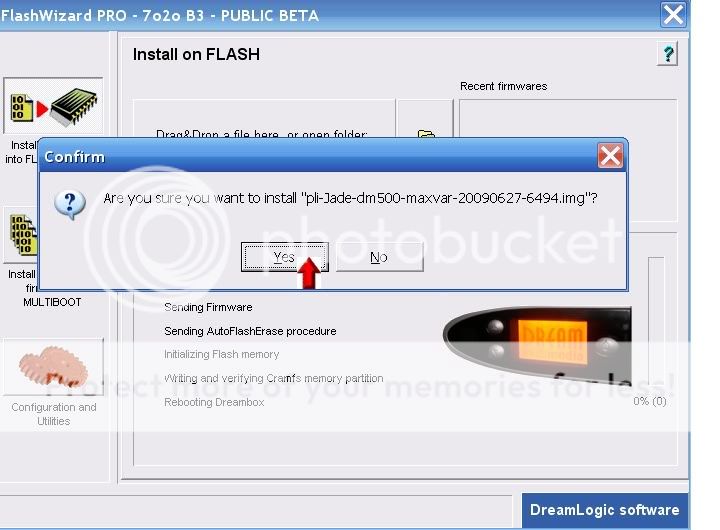
11. You'll now see the image been transfered.
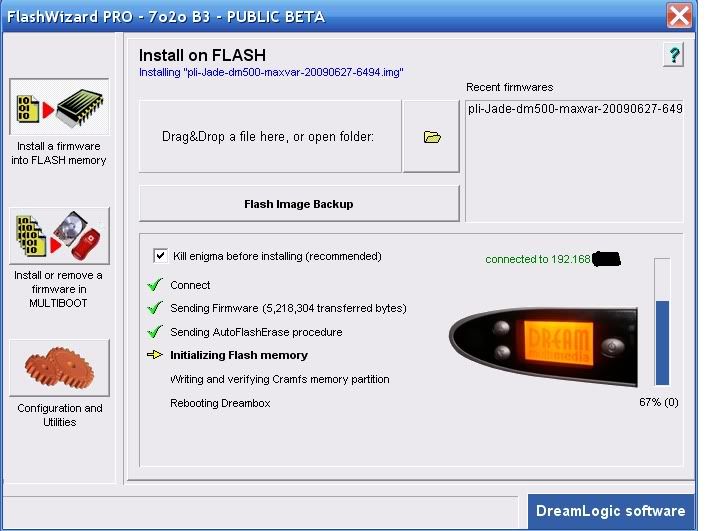
12. And then image transfer completed.

13. Exit Flashwizard and pull the power from you dreambox and wait for 30 seconds before reapplying power.
14. Time to get sat in front of the TV! As your box boots you’ll see the Boot Logo Screen come up maybe a couple of times.
15. At the Pal Screen Select Pal or the system your TV uses and then press the green button on your remote to save.
16. Select your language and press the ok button.
17. Select your time zone and press the green button to save.
18. You’ll now see the Diseqc Setup menu and have 3 options to choose from
No Diseqc for a single LNB Setup.
Simple For a the setup of 2 Lnb’s
Complex for Diseqc 1.2 or Usuals/Goto X
19. If you want to use usuals keeps the goto x box ticked and enter your Longitude and latitude and press the green button to save.
20. Now select Auto Transponder Scan. This will scan all available transponders till a valid one is found. When found press green to scan. When the scan is complete press ok.At this point you can now scan another satellite with a press of the green button or red not to. Later on in this tutorial ill be explaining how to transfer channel setting so you don’t really need to.
21. Click exit and select a channel free to air to view.Now press the menu button-option5-reboot now, this will save your settings.
That’s the flash and initial setup complete.
Ferret
1. Extract Flashwizard Pro to a folder of your Choice.
2. Start Flashwizard with the FlashwizardPro.exe.
3. Click the configuration tab and select you language.
4. On the same page you'll need to fill in the Connection Parameters at the top of the page.
5. If you have not changed you password Login= root password = dreambox.
6. To obtain your dreambox IP do the following on your dreambox remote.
Menu-Setup-Expert Setup-Communication Setup.
You'll see your IP at the top of the page make a note of this and enter this IP into Flashwizard.
Also untick the DHCP box so your Dreambox IP will never change and remain static.
7. Now click the install a firmware tab top left.
8. Now click on the yellow folder, this will open a browser window.
9. Now navigate to the Dreambox image you would like to install.
10. At the prompt select YES.
11. You'll now see the image been transfered.
12. And then image transfer completed.
13. Exit Flashwizard and pull the power from you dreambox and wait for 30 seconds before reapplying power.
14. Time to get sat in front of the TV! As your box boots you’ll see the Boot Logo Screen come up maybe a couple of times.
15. At the Pal Screen Select Pal or the system your TV uses and then press the green button on your remote to save.
16. Select your language and press the ok button.
17. Select your time zone and press the green button to save.
18. You’ll now see the Diseqc Setup menu and have 3 options to choose from
No Diseqc for a single LNB Setup.
Simple For a the setup of 2 Lnb’s
Complex for Diseqc 1.2 or Usuals/Goto X
19. If you want to use usuals keeps the goto x box ticked and enter your Longitude and latitude and press the green button to save.
20. Now select Auto Transponder Scan. This will scan all available transponders till a valid one is found. When found press green to scan. When the scan is complete press ok.At this point you can now scan another satellite with a press of the green button or red not to. Later on in this tutorial ill be explaining how to transfer channel setting so you don’t really need to.
21. Click exit and select a channel free to air to view.Now press the menu button-option5-reboot now, this will save your settings.
That’s the flash and initial setup complete.
Ferret